Friday, January 2, 2009
[教学] 快速 下载 youtube 影片 , 存档为 FLV video , RETRIEVE NOW
复制网址后,浏览以下网址
http://kej.tw/flvretriever/
,并将刚才所复制既网址如图中般贴上↓
然后按 RETRIEVE NOW !
想更快速,把URL放进 thunder 讯雷下,会更加快哦。
下载完后,记得rename 为 .flv 的档案,就可以播放了
如果你的电脑无法播放 请下载 安装 StormCodec6.08.13
请到下面的网址下载
http://www.gougou.com/search?search=StormCodec6.08.13&id=1
Thursday, January 1, 2009
[教学]如何在BlogSpot提交Sitemap?
来源 http://weisue.pixnet.net/blog/post/20457732
最近又弄了一个部落格,结果之前该做的一些SEO差点又都忘光光
(这个算是入门的SEO了,连我都会,那就代表大家都能会)
干脆写篇文当作笔记吧
哪天说不定又会用到
使用的环境:Blogspot (就是Google的部落格服务)
预期提交的Sitemap的网站:Google Yahoo MSN
首先呢
你必须要有Google Yahoo及MSN的帐号(我想大家应该都有吧,不然申请一个也不是什么难事!)
先介绍Google吧!
Google篇
先进到这个网页吧
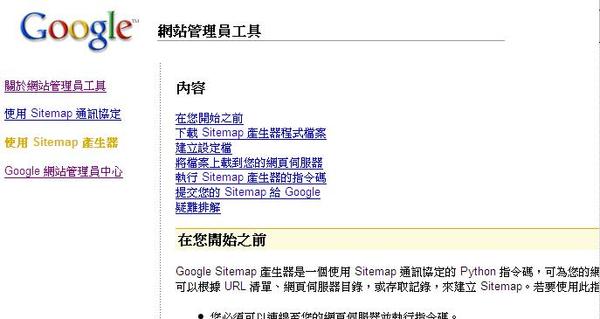
Google网站管理工具:https://www.google.com/webmasters/tools/docs/zh_TW/sitemap-generator.html
应该会看到这个画面
点选其中的『Google网站管理员中心』
就会看到这个画面了
应该知道要选哪一个吧
就是『网站管理员工具(包含Sitemaps)』
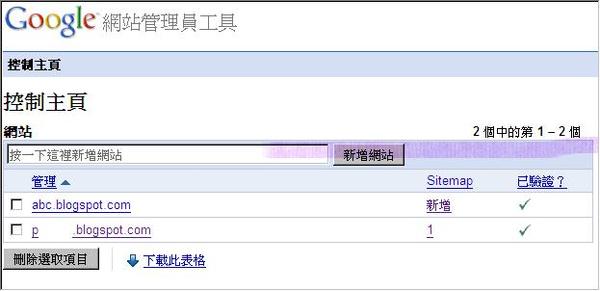
这样就可以看到你的控制主页了
如果你是第一次使用,里面就不会有网址了
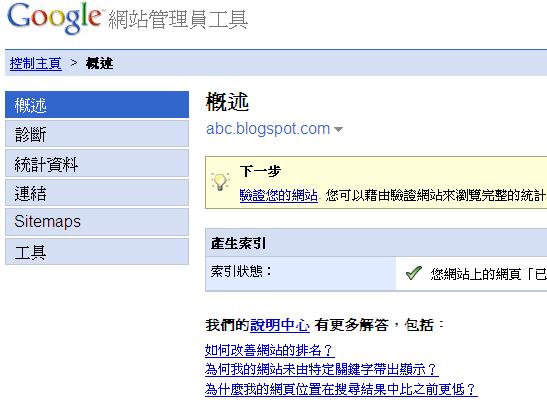
再来就是在『网站』那个框框打入你的网址,点选『新增网站』
比如说我的网站是http://abc.blogspot.com
就会有下面的画面了
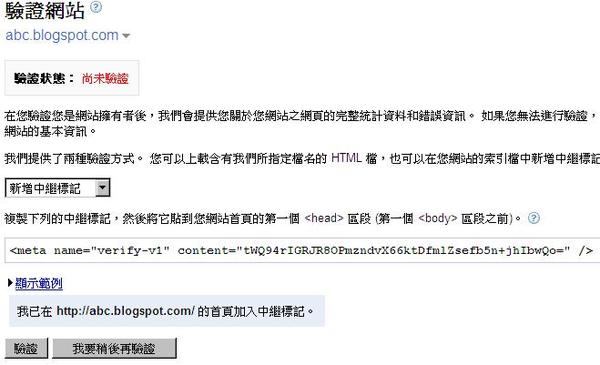
差不多了,再来就是『验证你的网站』
你必须告诉Google你是真的拥有这个网站的
要怎么证明你是这个网站的管理员呢
选取『新增中继标记』
然后把后面的程式码复制起来
等一下会用到喔!
PS:画面先别急着关喔!马上会用到!
Blogspot篇
现在就是要证明你真的拥有这个网站的时候了
进入Blogspot
这个画面应该很熟悉吧!
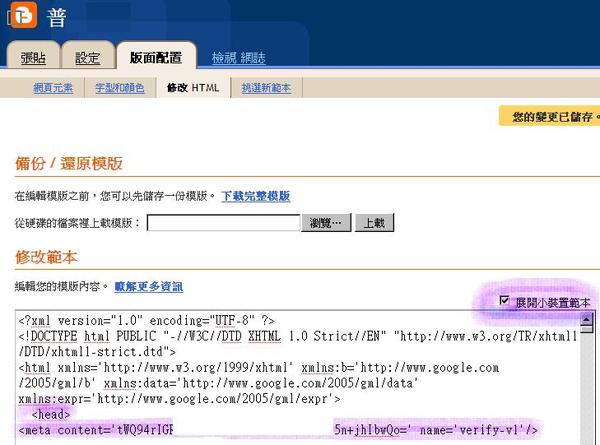
『版面配置』『修改HTML』
重点1:要点选『展开小装置范本』(为什么??我也不知道,不过大家都说要点!)
重点2:找到 (就在前面几行,不难找!)
重点3:把前面的那串『中继标记』贴到的下一行
然后点『储存范本』
这样你已经可以证明你拥有这个网站了
前面的那个有『中继标记』的页面还没关掉吧!
点『验证』
这样你就完成神圣的任务了吗? ?
当然没有
我们不是讲Sitemap吗
总是要新增个Sitemap吧
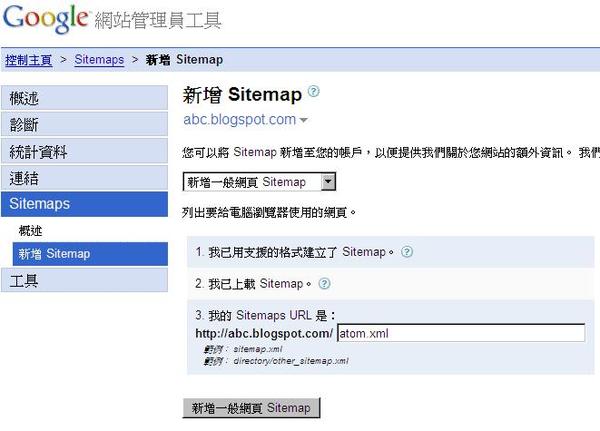
点选『新增』Sitemap
要提送什么样的Sitemap呢?选『新增一般网页Sitemap』
然后我的Sitemaps URL就打『atom.xml』 和 『atom.xml?redirect=false』
(为什么要打这个?我也不知道,应该是透过atom去订阅吧)
然后按『新增一般网页Sitemap』就大功告成了
这样『据说』Google就会自动去抓你的网页资料,并且列入他的搜寻资料里面了!
以后有人透过Google去搜寻某些关键字的时候,你的网页被搜寻到的机会就会大大提高喔!
How to Create and Schedule a SSIS package ( DTS ) Job in SQL Server 2005 / [教学]如何实现定时执行SSIS程序包 DTS job (中 英 文)
This post from / 来源
http://www.colestock.com/blogs/2008/06/how-to-create-and-schedule-ssis-job-in.html
This post covers how to create and schedule a SSIS job on SQL Server 2005.
The biggest challenge in doing this has to do more with the convaluted security setup, than with the SSIS package creation and/or scheduling.
The first step is to create the necessary security objects:
ssis_security_setup.sql
Create a Login who will own the job
创建一个新的帐号给ssis用
Grant the sysadmin role to the previously created login
再创建帐号的角色
Create a user in the msdb system database for the login, creating the mapping
继续创建
Grant the following roles to the user
继续创建
Create a credential to be used by the proxy - the proxy will execute the SSIS package within the job
继续创建
Create the proxy, mapping to the credential and provide access to the SSIS subsystem
继续创建
Now you are ready to create a sample SSIS package.
现在你已准备好了,开始执行SSIS DTS包的做功。
PS:如果你的SSIS包写好了,这步骤跳。
I launch the SQL Server Business Intelligence Development Studio via All Programs -> Microsoft SQL Server 2005 -> SQL Server Business Intelligence Development Studio
I create a project named sample_ssis, which consists of a Transfer Database Task, which refreshes a database from one SQL Server instance to another:
sample_ssis.dstx
Task Properties
Once the sample SSIS package is created, import into the msdb system database via Integration Services:
接下来把你的SSIS DTS放进Integration Services跑。
Login to Integration Services
Import the SSIS Package from the File System
Login to the Database Engine using ssis_usr
Create a SQL Server Agent Job
Create a Step within the Job run by ssis_prxy
Create a Schedule for the Job
Monitor the Job
You should see something similar to the aforementioned if your job executed successfully.
对不起,华语程度有限,不很厉害翻译。
不需要流利的英文也能明白。
本人已经成功执行了,祝你好运。
http://www.colestock.com/blogs/2008/06/how-to-create-and-schedule-ssis-job-in.html
This post covers how to create and schedule a SSIS job on SQL Server 2005.
The biggest challenge in doing this has to do more with the convaluted security setup, than with the SSIS package creation and/or scheduling.
The first step is to create the necessary security objects:
ssis_security_setup.sql
Create a Login who will own the job
创建一个新的帐号给ssis用
USE [master]
GO
CREATE LOGIN [ssis_usr] WITH PASSWORD=N'password', DEFAULT_DATABASE=[msdb], CHECK_EXPIRATION=OFF, CHECK_POLICY=OFF;
GO
Grant the sysadmin role to the previously created login
再创建帐号的角色
sp_addsrvrolemember @loginame = N'ssis_usr', @rolename = N'sysadmin'
GO
Create a user in the msdb system database for the login, creating the mapping
继续创建
USE [msdb]
GO
CREATE USER [ssis_usr] FOR LOGIN [ssis_usr]
GO
Grant the following roles to the user
继续创建
sp_addrolemember N'SQLAgentReaderRole', N'ssis_usr';
GO
sp_addrolemember N'SQLAgentOperatorRole', N'ssis_usr'
GO
sp_addrolemember N'SQLAgentUserRole', N'ssis_usr'
GO
Create a credential to be used by the proxy - the proxy will execute the SSIS package within the job
继续创建
USE [master]
GO
CREATE CREDENTIAL [ssis_cred] WITH IDENTITY = N'PRIVATE-E3A52F5\James', SECRET='password';
GO
Create the proxy, mapping to the credential and provide access to the SSIS subsystem
继续创建
USE [msdb]
GO
sp_add_proxy @proxy_name=N'ssis_prxy', @credential_name=N'ssis_cred';
GO
sp_grant_proxy_to_subsystem @proxy_name=N'ssis_prxy', @subsystem_name=N'SSIS';
GO
Now you are ready to create a sample SSIS package.
现在你已准备好了,开始执行SSIS DTS包的做功。
PS:如果你的SSIS包写好了,这步骤跳。
I launch the SQL Server Business Intelligence Development Studio via All Programs -> Microsoft SQL Server 2005 -> SQL Server Business Intelligence Development Studio
I create a project named sample_ssis, which consists of a Transfer Database Task, which refreshes a database from one SQL Server instance to another:
sample_ssis.dstx
Task Properties
Once the sample SSIS package is created, import into the msdb system database via Integration Services:
接下来把你的SSIS DTS放进Integration Services跑。
Login to Integration Services
Import the SSIS Package from the File System
Login to the Database Engine using ssis_usr
Create a SQL Server Agent Job
Create a Step within the Job run by ssis_prxy
Create a Schedule for the Job
Monitor the Job
You should see something similar to the aforementioned if your job executed successfully.
对不起,华语程度有限,不很厉害翻译。
不需要流利的英文也能明白。
本人已经成功执行了,祝你好运。
3x3x3 / 三阶 魔术方块 暴力 DIY 有图 十分简单
来源 http://www.unicube.tw/06/force_adjust.htm
首先先註明一下,本篇教學「官方3x3方塊暴力調整法」,依各人功力不同,會有不同的結果,
若造成任何的損壞,「個人造業個人擔」,請認命..orz
一開始我們要的準備的東西有:
未調整的官方方塊 x 1 (玩具反斗城賣的就是這種)
一字起子 x 1
斜口鉗 x 1
潤滑劑 x 1
先來介紹一下哪種方塊需要調整,是要「官方非組裝方塊」,就是網站購物車中的「R3S」,
若你拆開中心是長這個樣子的就是了:
若不清楚的話請看「官方3x3方塊的種類分析」
首先先把方塊拿出來:
用一字起子拆開它:(這一步要小心,可能會在方塊上造成刮痕)
拆光後我們拉一下軸,看起來縫細超小:
再來我們介紹我們的主要工具:斜口鉗
我們要利用斜口鉗背面的斜面來做調整,然後把平的那面對著方塊的軸心,如下圖:
所以斜口鉗要夾住中間的縫細,然後用力夾,因為把斜口鉗夾緊,那個斜面就會把中心塊強迫往上提,如下圖:
→(夾)→ |
這邊有幾個注意事項:
1.中心塊要擺正,不要讓斜口鉗擠到中心塊,不然的話中心塊的角落會擠到變形。
2.不同的斜口鉗背面斜度都不一樣,若是把中心塊提太上來,可能會造成方塊過鬆,就宣告不治了...
3.「個人造業個人擔」,夾壞了不要找我...功力問題@_@
然後我們把六個軸都夾一夾:(這一步可能造成中心歪斜、中心塊中心軸擠壓造成轉到不順)
仔細比較夾之前和夾之後的縫細大小:
調整前 | 調整後 |
---|---|
縫細稍微變大了,這樣六個軸就會鬆一點,這樣就會順很多了,
然後把方塊組回去,上潤滑劑:
一顆成功改造的官方方塊就誕生了+_+
PS.凡是和我買官方非組裝方塊的人請不用擔心,出貨前每一顆我都有做這種處理。
個人造業個人擔....
Subscribe to:
Posts (Atom)